As we step into the world of roofing inspections, we find ourselves navigating through a storm of knowledge, aiming to assess the damage with precision.
Like a captain charting a course through treacherous waters, we must rely on our expertise to guide us.
However, in this vast sea of information, it is crucial to approach the task with a level-headed professionalism, steering clear of overwhelming excitement.
So, if you're ready to embark on this journey with us, join us as we unravel the secrets of correctly assessing storm damage on roofs.
Key Takeaways
- Regular expert roof inspection is crucial for maintaining the integrity and longevity of the roofing system.
- Identifying signs of storm damage, such as missing or damaged shingles and water stains, is essential for timely repairs.
- Assessing the condition of roof shingles, including curling and excessive granule loss, helps prevent water infiltration and damage.
- Checking the integrity of flashing and sealant, as well as inspecting gutters and downspouts, is important for preventing leaks and water damage.
Importance of Expert Roof Inspection

Expert roof inspection is crucial for identifying potential issues and ensuring the overall integrity and longevity of the roofing system. Regular maintenance of the roof provides several benefits, including early detection and prevention of damage, which can save homeowners from costly repairs in the long run.
One of the common causes of roof damage is extreme weather conditions, such as strong winds, heavy rain, or hailstorms. These can result in loose or missing shingles, leaks, and structural damage. Additionally, poor installation or maintenance practices can also lead to roof problems, including improper flashing, inadequate insulation, or lack of ventilation.
Identifying Signs of Storm Damage
After a storm, it's crucial to carefully inspect your roof for any signs of damage. Conducting a thorough roof inspection following a storm is essential to identify any potential issues and ensure timely repairs. Here are four key signs to look for during the roof inspection process:
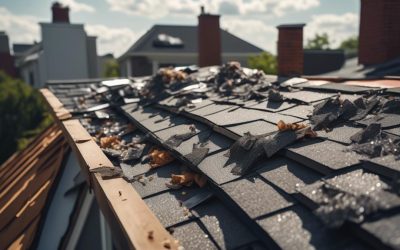
- Missing or damaged shingles: Check for any shingles that are completely missing or visibly cracked, curled, or broken. These can be indicators of significant storm damage.
- Granule loss: Inspect your gutters for an excessive amount of granules. Granule loss is a common sign of aging or storm damage, and it can compromise the integrity of your roof.
- Water stains and leaks: Look for any water stains or discoloration on the ceiling or walls inside your home. These can be indications of roof leaks caused by storm damage.
- Damaged flashing: Examine the flashing around chimneys, vents, and skylights. Bent, cracked, or missing flashing can lead to water infiltration and subsequent roof damage.
Assessing Roof Shingle Condition

During the roof inspection process, it is important to carefully assess the condition of the roof shingles to identify any potential damage or issues. Roof shingle maintenance is crucial for the overall health and longevity of your roof. Here are some common roof shingle problems to look out for:
- Curling: Shingles that curl upward or downward can indicate weathering or moisture damage. This can lead to leaks and further deterioration if not addressed promptly.
- Missing or Damaged Shingles: Any missing or damaged shingles need to be replaced immediately to prevent water infiltration and potential structural damage.
- Granule Loss: Excessive granule loss can be a sign of aging shingles or poor manufacturing quality. Granule loss can expose the underlying asphalt, making the shingles more susceptible to damage.
To help you better understand the condition of your roof shingles, here is a table summarizing the common problems, their causes, and recommended actions:
| Problem | Cause | Recommended Action |
|---|---|---|
| Curling | Weathering, moisture damage | Replace curled shingles to prevent further deterioration |
| Missing or Damaged | Strong winds, impact, aging | Replace missing or damaged shingles to prevent leaks |
| Granule Loss | Aging, poor manufacturing quality | Consider replacement if excessive granule loss is observed |
Regular roof shingle maintenance and timely repairs are essential for keeping your roof in optimal condition. If you notice any of these common problems, it is important to consult a professional roofing contractor to address the issues promptly. By doing so, you can extend the lifespan of your roof and avoid costly repairs in the future.
Evaluating Flashing and Sealant Integrity
How can you evaluate the integrity of the flashing and sealant on your roof? It's crucial to regularly inspect the flashing and sealant to ensure that they're in good condition and performing their intended functions. Here are four key factors to consider when evaluating the flashing and sealant on your roof:
- Visual inspection: Start by visually examining the flashing and sealant for any signs of damage, such as cracks, gaps, or deterioration. Look for any areas where the flashing isn't securely attached or where the sealant appears to be peeling or missing.
- Water tightness: Check for any water leaks or stains on the roof, ceiling, or walls, as these may indicate that the flashing and sealant aren't effectively preventing water intrusion. Pay close attention to areas where the flashing is installed, such as around chimneys, skylights, vents, and roof edges.
- Proper installation: Ensure that the flashing is properly installed and aligned with the roof surface. The flashing should be securely fastened and tightly sealed to prevent water penetration. Look for any signs of improper installation, such as loose or overlapping flashing.
- Maintenance and durability: Regularly maintain and clean the flashing and sealant to prolong their lifespan and prevent deterioration. Apply a fresh coat of sealant when necessary to maintain its durability and effectiveness in sealing gaps and joints.
Checking for Leaks and Water Damage

Now let's turn our attention to checking for leaks and water damage on the roof.
Spotting hidden leaks can be challenging, but by closely inspecting the roof for any signs of water damage, such as stains or discoloration on the ceiling or walls, we can identify potential problem areas.
It's crucial to carefully examine the roof's surface, paying attention to any cracked or missing shingles, damaged flashing, or deteriorated sealant that could be causing leaks.
Spotting Hidden Leaks
To effectively spot hidden leaks and check for water damage on a roof, we must employ a meticulous and thorough inspection method. Here are four steps to help us in this process:
- Start by visually inspecting the roof for any signs of water stains or discoloration on the ceiling or walls inside the property. These can be indicators of hidden leaks.
- Next, carefully examine the roof for any cracked, missing, or damaged shingles. Pay close attention to areas around vents, chimneys, and skylights, as these are common areas for leaks to occur.
- Use a flashlight to inspect the attic for any signs of water intrusion, such as damp insulation or water stains on the rafters. This will help us identify the source and extent of the leak.
- Finally, if we suspect a hidden leak, it may be necessary to perform a water test by using a hose to simulate rainfall on the roof. This will help us pinpoint the exact location of the leak.
Water Damage Indicators
In order to effectively check for leaks and water damage on a roof, we must carefully examine the following indicators. Roof leaks can cause extensive damage if left unnoticed, so it's crucial to identify any signs of water infiltration.
One indicator of water damage is the presence of water stains on the ceiling or walls inside the building. These stains often appear as discolored patches or rings and shouldn't be ignored.
Additionally, damp or musty odors in the attic or living spaces can be a sign of hidden water damage. It's important to thoroughly inspect the roof for any cracked or missing shingles, as these can allow water to seep in.
Furthermore, inspecting the gutters and downspouts for debris or blockages is essential, as clogged gutters can lead to water overflow and potential water damage.
Identifying Roof Leaks
Having thoroughly examined the indicators of water damage on a roof, we can now move on to the crucial task of identifying roof leaks and checking for further water damage. Here are four key steps to effectively identify roof leaks and prevent further damage:
- Visual Inspection: Start by examining the roof for any visible signs of water intrusion, such as dark stains, discoloration, or water pooling. Pay close attention to areas around vents, chimneys, skylights, and flashing.
- Attic Inspection: Proceed to the attic and look for signs of water damage, such as wet insulation, mold growth, or water stains on the ceiling. Use a flashlight to carefully inspect all corners and crevices.
- Water Testing: If the source of the leak is still unclear, simulate rain by using a hose to spray water on specific areas of the roof. Have someone inside the attic to identify any signs of water penetration.
- Professional Inspection: If you're unable to locate the leak or suspect significant damage, it's advisable to seek the assistance of a professional roofing contractor. They've the expertise and tools to accurately identify and repair roof leaks.
Inspecting Gutters and Downspouts

We will now inspect the condition of the gutters and downspouts to ensure proper functionality and prevent potential water damage.
Proper gutter maintenance is crucial for the overall health of your roof, as clogged or damaged gutters can lead to water overflow and seepage into your home. Start by examining the gutters for any signs of wear or damage, such as sagging or separation. If you notice any issues, it's important to address them promptly to prevent further damage.
Clean out any debris or leaves that may have accumulated in the gutters, as this can obstruct the flow of water and cause backups. Downspout repair is also essential, as damaged or disconnected downspouts can redirect water towards the foundation of your home, leading to costly water damage.
Inspect the downspouts for any cracks, leaks, or detachment from the gutters. Repair or replace any damaged parts to ensure proper water drainage away from your home.
Documenting and Reporting Storm Damage
To accurately assess and address storm damage, it's essential to thoroughly document and report all observed issues with the roof. Proper documentation plays a crucial role in the roof damage prevention and insurance claims process. Here are four key steps to effectively document and report storm damage:
- Inspect the roof: Conduct a detailed examination of the roof, noting any visible signs of damage such as missing shingles, dents, or cracks. Take clear photographs or videos to provide visual evidence.
- Document the date and time: Record the exact date and time when the storm occurred. This information is important for insurance purposes and can help establish a timeline of events.
- Note the extent of damage: Describe the extent of the damage in detail. Include the affected areas, the size of the damage, and any other relevant information. This will help the insurance adjuster assess the severity of the damage.
- Contact your insurance provider: Report the storm damage to your insurance provider as soon as possible. Provide them with all the documentation and evidence you have gathered. This will expedite the claims process and ensure a smoother resolution.
Frequently Asked Questions
What Are the Common Causes of Roof Damage During a Storm?
During a storm, there are several common causes of roof damage. High winds can lift and remove shingles, leaving the underlying roof structure vulnerable.
Hailstorms can cause dents and punctures in the roof surface, leading to leaks and further damage.
Heavy rain can also cause water to seep through any weak spots in the roof, potentially causing interior damage.
It's important to promptly address any roof damage to prevent further issues and to ensure that insurance claims for roof repair are successful.
How Much Does a Professional Roof Inspection Typically Cost?
A professional roof inspection typically costs an average of $200 to $600, depending on various factors such as the size of the roof, its accessibility, and the location of the property. Additional factors like the level of expertise of the inspector and any necessary equipment or materials can also affect the cost.
It's important to budget for a roof inspection as part of regular maintenance to ensure any potential issues are identified and addressed promptly.
Are There Any DIY Methods to Assess Storm Damage to a Roof?
There are indeed a few DIY methods that can be used to assess storm damage to a roof.
One technique is to visually inspect the roof for any signs of missing or damaged shingles, as well as any loose or displaced flashing.
Another method is to check for any water stains or leaks in the attic or ceiling, which could indicate roof damage.
It's important to exercise caution and prioritize safety when attempting any DIY roof assessments.
How Long Does a Roof Inspection Usually Take?
Roof inspection duration can vary depending on the size and condition of the roof. Factors such as accessibility, complexity of the roof design, and the presence of any storm damage can also affect the time it takes.
To speed up the roof inspection process, it's important to be well-prepared with the necessary tools and equipment. Additionally, having a systematic approach and conducting a thorough visual inspection can help identify any potential issues efficiently.
Can Roof Damage That Is Not Visible to the Naked Eye Still Be Identified During an Inspection?
Oh, the joys of detecting roof damage that isn't visible to the naked eye during an inspection! It's like finding a needle in a haystack, but fear not, for professional roof inspections have their ways.
From infrared scans to moisture meters, these detection methods can uncover hidden damage lurking beneath the surface.
It's crucial to rely on the expertise of professionals who know what to look for and how to identify even the most concealed issues.