When a storm hits and damages our roof shingles, it can feel overwhelming to think about the process of replacing them. However, rest assured that there are top solutions available to help restore your roof to its former glory.
In this discussion, we will explore the steps involved in replacing roof shingles after a storm, from conducting a thorough inspection to choosing the right shingles and hiring a professional roofer.
We will also delve into the importance of removing damaged shingles and installing new ones correctly, as well as provide maintenance tips for ensuring the longevity of your newly replaced roof.
So, let's explore these solutions together and discover how you can effectively tackle roof shingle replacement after a storm.
Key Takeaways
- Conduct a thorough inspection of the roof to assess storm damage and identify any signs of wear and tear.
- Promptly address any small issues with shingles to prevent bigger problems, such as leaks and water damage.
- Choose shingles that are durable, weather-resistant, and suitable for the specific climate and conditions.
- When hiring a professional roofer for shingle replacement, prioritize quality and ensure they are licensed and insured.
Roof Inspection

During a roof inspection, we carefully examine the condition of the shingles to assess any damage caused by the recent storm. Roof inspections are an essential part of roof maintenance and can help identify issues early on, preventing further damage and the need for extensive roof repairs.
When inspecting the shingles, we look for signs of wear and tear, such as cracks, curling, or missing pieces. These can indicate that the shingles are nearing the end of their lifespan and may require replacement. Additionally, we check for any signs of damage caused by the storm, such as dents or punctures from fallen debris.
It is important to note that even small issues with the shingles can lead to bigger problems if left unaddressed. Damaged or missing shingles can expose the underlying roof structure to moisture, which can lead to leaks and water damage.
Regular roof inspections and prompt roof repair can help prevent these issues and extend the lifespan of your roof.
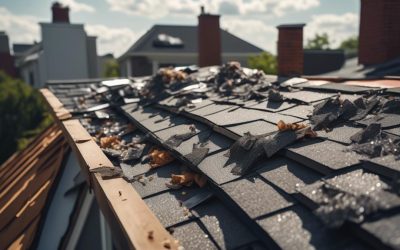
Identifying Storm Damage
After conducting a thorough roof inspection for signs of wear and tear or damage caused by the recent storm, we now shift our focus to identifying specific indicators of storm damage on the shingles. It's crucial to accurately assess roof damage to determine if it qualifies for an insurance claim.
Here are three key indicators to look for:
- Missing Shingles: Look for any shingles that have been completely torn off or are partially detached. This is a clear sign of storm damage and should be addressed promptly.
- Granule Loss: Examine the shingles for excessive granule loss. If you notice a significant amount of granules in your gutters or on the ground, it indicates that the shingles have been damaged and may require replacement.
- Cracks or Curling: Inspect the shingles for cracks or curling. Cracks can weaken the shingles and make them more susceptible to further damage. Curling, on the other hand, is a sign of aging and can be exacerbated by a storm.
Identifying these indicators of storm damage is essential for the roof damage assessment and the insurance claims process. If you notice any of these signs, it's recommended to contact a professional roofing contractor to further assess the damage and guide you through the insurance claims process.
Choosing the Right Shingles

To choose the right shingles for your roof, consider factors such as durability, style, and weather resistance.
Roof shingle durability is a crucial aspect to consider when selecting the right shingles for your roof. It's important to choose shingles that are able to withstand the elements and last for an extended period of time. Look for shingles that have a high rating for impact resistance and are resistant to cracking and splitting.
Another factor to consider is the different shingle styles available. There are a variety of shingle styles to choose from, including asphalt, wood, slate, and metal. Each style has its own unique characteristics and aesthetic appeal.
Asphalt shingles are the most common and affordable option, offering a wide range of colors and styles.
Wood shingles provide a natural and rustic look, but require more maintenance.
Slate shingles are known for their durability and longevity, but can be expensive.
Metal shingles are becoming increasingly popular due to their durability and energy efficiency.
Hiring a Professional Roofer
Now let's explore the next step in the process: finding and hiring a professional roofer to handle the roof shingle replacement. Hiring a contractor for this task is crucial to ensure a successful and efficient roof repair.
Here are three key factors to consider when hiring a professional roofer:
- Experience and Expertise: Look for a roofing contractor with a proven track record in shingle replacement. Check their experience in handling similar projects and their knowledge of different roofing materials. A well-established roofer will have the expertise to identify any underlying issues and recommend the best solutions for your roof.
- Licensing and Insurance: It's essential to hire a contractor who's licensed and insured. A valid license ensures that the professional has met the necessary requirements and regulations. Insurance coverage protects both you and the contractor in case of accidents or damages during the project.
- Cost of Professional Installation: While cost is a significant consideration, it shouldn't be the sole determining factor. Obtain multiple quotes from different contractors and compare their services, warranties, and materials. Remember, the cheapest option may not always be the best quality. Choose a contractor who offers a fair price while maintaining high standards of workmanship.
Removing Damaged Shingles

When it comes to removing damaged shingles, there are a few important points to consider.
First, it's crucial to use proper shingle inspection techniques to identify which shingles are damaged and need to be removed.
Once identified, these shingles should be removed carefully to avoid causing further damage to the roof.
Shingle Inspection Techniques
Inspecting and removing damaged shingles can be accomplished using a variety of techniques, ensuring a thorough evaluation of the roof's condition. Here are three effective shingle inspection techniques:
- Visual Inspection:
Start by visually inspecting the roof from the ground using binoculars, looking for signs of shingle deterioration such as cracked, curled, or missing shingles. Pay attention to areas where water might pool, like valleys and near chimneys.
- Physical Examination:
Get on the roof and physically inspect the shingles, checking for loose or lifted shingles, granule loss, or any other visible damage. Gently run your hands over the shingles to feel for any abnormalities.
- Water Test:
Use a hose to simulate rain and observe how water flows over the shingles. Check for any leaks or water penetration. Look for signs of water damage inside the attic or ceiling as well.
Proper Shingle Removal
To properly remove damaged shingles, it's essential to follow a systematic approach that ensures minimal disruption and maximizes efficiency. Here is a step-by-step guide on how to remove shingles effectively:
- Gather the necessary roofing tools: You'll need a pry bar, hammer, utility knife, and a roofing shovel.
- Start at the ridge and work your way down: Begin by removing the ridge cap shingles and then move downwards towards the eaves.
- Use the pry bar to lift the damaged shingle: Carefully insert the pry bar under the shingle and gently lift it to loosen the nails.
- Remove the nails: Once the shingle is lifted, use the hammer to remove the nails from the roof deck.
- Dispose of the damaged shingles properly: Place the removed shingles in a designated disposal container to ensure safe and responsible shingle disposal.
Following these steps will help you efficiently remove damaged shingles and prepare your roof for replacement.
Disposing of Damaged Shingles
We can dispose of the damaged shingles by carefully placing them in a designated disposal container. Proper disposal of damaged shingles is important to ensure a clean and safe environment.
Here are some disposal methods and recycling options to consider:
- Landfill disposal: If there are no recycling options available, damaged shingles can be disposed of in a landfill. However, this should be the last resort as it contributes to waste accumulation.
- Recycling: Many recycling facilities accept asphalt shingles for recycling. These shingles can be processed and reused in various applications, such as road construction and pavement.
- Local recycling programs: Check with your local waste management authorities or roofing contractors to find out if they offer shingle recycling programs. These programs help divert waste from landfills and promote sustainability.
Installing New Shingles

When it comes to installing new shingles, there are three main points to consider.
First, understanding the shingle installation process is crucial for a successful replacement.
Second, selecting the right replacement materials, such as asphalt or architectural shingles, is essential for durability and aesthetics.
Lastly, homeowners must decide whether to tackle the installation themselves or hire a professional for a seamless and efficient process.
Shingle Installation Process
For the shingle installation process, begin by preparing the roof surface and ensuring it's clean and free of any debris. This is crucial to create a smooth and even base for the new shingles. Once the surface is ready, follow these steps:
- Install underlayment: Lay down a layer of roofing felt or synthetic underlayment to provide an extra barrier against water and protect the roof deck.
- Apply starter shingles: Start at the bottom edge of the roof and attach starter shingles to provide a secure foundation for the rest of the shingles.
- Install the shingles: Begin at the bottom and work your way up, overlapping each shingle to create a watertight seal. Use roofing nails to secure the shingles in place, following the manufacturer's guidelines.
Remember to consider the roofing materials and shingle color options to ensure that your new shingles not only provide protection but also enhance the aesthetic appeal of your home.
Choosing Replacement Materials
After completing the shingle installation process, the next step is to carefully consider and select the appropriate replacement materials for installing new shingles.
When it comes to roofing material options, there are a few key factors to consider. First, you'll want to choose a material that's durable and able to withstand the elements. Common options include asphalt, wood, metal, and slate. Each material has its own pros and cons, so it's important to do your research and choose the one that best suits your needs and budget.
Additionally, shingle color selection is an important aesthetic consideration. You'll want to choose a color that complements the style of your home and enhances its overall appearance.
DIY or Professional Installation
We can either choose to install new shingles ourselves or hire a professional for the installation process. Both options have their pros and cons, and it's important to consider factors such as cost, expertise, and time commitment before making a decision.
Here is a cost comparison between DIY and hiring a professional for shingle installation:
- DIY:
- Cost: DIY installation can be more cost-effective since you won't have to pay for labor. However, keep in mind that you'll need to purchase the necessary tools and materials.
- Expertise: DIY installation requires some level of roofing knowledge and experience. If you're confident in your skills and have the necessary tools, you may be able to handle the job.
- Time: Installing shingles yourself can be time-consuming, especially if you're not familiar with the process. It may take longer to complete the project compared to hiring a professional.
- Hiring a professional:
- Cost: Hiring a professional can be more expensive due to labor costs. However, they often have access to discounted materials and can provide warranties for their work.
- Expertise: Professionals have the necessary skills and experience to install shingles correctly. They can ensure that the job is done efficiently and to industry standards.
- Time: Hiring a professional can save you time and effort. They've the knowledge and equipment to complete the installation quickly and efficiently.
Ultimately, the decision between DIY installation and hiring a professional depends on your budget, skill level, and time availability. Consider the cost comparison and weigh the benefits and drawbacks of each option before making your decision.
Maintenance Tips for Longevity

To ensure the longest possible lifespan for your roof shingles, it's essential to implement regular maintenance practices. Following a maintenance schedule and using proper roof cleaning techniques can significantly increase the longevity of your shingles.
Firstly, it's crucial to establish a maintenance schedule for your roof. Regular inspections should be conducted at least twice a year, preferably in the spring and fall. During these inspections, you should check for any signs of damage, such as missing or cracked shingles, and address them promptly to prevent further issues.
In addition to inspections, proper roof cleaning techniques are essential for maintaining the integrity of your shingles. It's important to remove any debris, such as leaves or branches, from your roof regularly. This can be done using a broom or a leaf blower. However, be cautious not to damage the shingles while cleaning.
Furthermore, moss and algae growth can also impact the lifespan of your roof shingles. To prevent this, consider using a moss and algae-resistant solution or installing zinc or copper strips along the roof ridge. These materials release chemicals that inhibit the growth of moss and algae.
Frequently Asked Questions
How Long Does a Roof Inspection Typically Take?
When it comes to a roof inspection, the duration can vary depending on several factors. These factors include the size of the roof, the complexity of the roof structure, and any specific issues that need to be addressed.
Generally, a roof inspection typically takes around 1-2 hours. However, it's important to note that this timeframe can be longer or shorter depending on the specific circumstances.
What Are the Signs of Storm Damage on Roof Shingles?
When it comes to storm damage on roof shingles, there are some key signs to look out for.
Curling, cracking, or missing shingles are obvious indicators. Additionally, granule loss, dents, or indentations can signify damage.
It's crucial to address these issues promptly to avoid further problems and costly roof shingle repair or replacement costs.
Regular inspections can help catch any storm damage early on, saving you money and ensuring the longevity of your roof.
Can I Install New Shingles Over the Existing Ones?
Installing new shingles over existing ones is possible, but it has its pros and cons.
The main advantage is that it saves time and money since you don't have to remove the old shingles.
However, layering shingles can make the roof heavier and decrease its lifespan.
It can also hide underlying issues and affect the overall aesthetics.
It's important to consult with a professional to determine if layering shingles is the best solution for your specific situation.
How Often Should I Clean and Maintain My New Shingles for Longevity?
Roof shingle maintenance is crucial for their longevity. Regular cleaning is important to prevent debris buildup, which can lead to moisture retention and mold growth.
We recommend cleaning your new shingles at least twice a year, or more often if you live in an area with heavy rainfall or a lot of trees. Use a soft brush or broom to remove dirt and leaves, and consider using a mild detergent for tougher stains.
Regular maintenance will help ensure the longevity of your new shingles.
What Are Some Common Mistakes to Avoid When Hiring a Professional Roofer?
When hiring a professional roofer, it's crucial to avoid common mistakes that may lead to costly regrets.
One anachronism that stands out is overlooking the roofer's qualifications. It's important to ensure they're licensed, insured, and have the necessary experience.
Additionally, pricing shouldn't be the sole factor in your decision-making process. Consider their reputation and the quality of their work.
Lastly, effective communication is key to a successful roofing project.